Home Network

2023-11-08
If you have more than one computer, you will want to set up a little network. Buy a router, a box that connects downstream of your cable or DSL modem, and that lets you connect several computers to it. For example a wireless/wired router (Some cable suppliers like Xfinity will rent you a combination modem and router, or you can buy your own.) A router allows you to share the Internet Service Provider (ISP) network connection with multiple computers, and also allows computers on your home network to communicate and share files with each other.
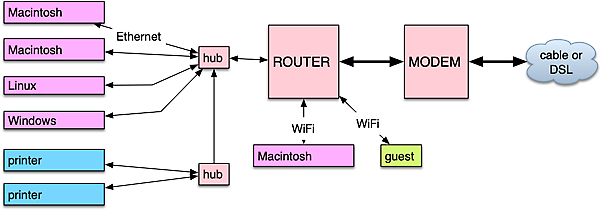
This diagram shows a network with several types of computer. The local computers are connected to the router by Ethernet cables or wireless (WiFi). Wired connections are faster, less subject to interference, and less vulnerable to security attack. I use both at home.
For advanced information on home networking, you can read Glenn Fleishman's ![]() "Take Control of WiFi Networking and Security".
"Take Control of WiFi Networking and Security".
Configuring Your Router
Your router should be configured as a DHCP Server. That is, it makes up local Internet Protocol addresses for each device on your local network, and sends all devices' outgoing packets out over the your external Internet Protocol address. When a response packet comes back, the router matches up the packet sender with that of a previous request, and forwards the response to the IP address of the local machine that is expecting it. Unsolicited messages are dropped, protecting your local computers from a lot of attacks.
(By the way, do not configure your WiFi router to hide the network name (SSID). This actually decreases security. Make up a random string for the name.)
A network route cannot transmit data faster than the speed provided by its slowest component. If you upgrade your cable subscription to 800 MB/s, but your router can only handle 200MB/s, you won't get full speed. Similarly, if you try to do gigabit Ethernet communication through a hub or cable that can only handle 10MB Ethernet, you won't get full speed. (Hint: your cables should be marked "CAT 5e" or "CAT 6".)
You can purchase a Network Attached Storage box containing disk drives and attach it to your network, and store files there. This can be very handy for doing backup.
Router and WiFi Security
There have been recent reports of security problems with home routers. Some routers have "back doors" built into them; others can be hijacked if you visit a malicious web page.
- Set a good password on your wireless network.
- Be sure you have a strong administrator password on your router; don't use the factory default.
-
Set the DNS servers on your Mac, for both Ethernet and WiFi, to a public DNS (like OpenDNS) instead of using the default supplied by your ISP.
- OpenDNS: 208.67.222, 208.67.220
- Google public DNS: 8.8.8.8, 8.8.4.4
- Search the Web for information on your router: update its firmware to be safe.
If you are really interested in securing your network, read https://lifehacker.com/how-to-tap-your-network-and-see-everything-that-happens-1649292940
My Home Network
I replaced my cable modem with a new, faster cable modem. I replaced my Apple Time Capsule with a new mesh router system. My new setup is described in Home Network Upgrade.
Hubs and Cables
If you need to connect more computers or devices to your network than there are ports on your router, use an Ethernet hub. Modern Macintoshes can send data very fast, at Gigabit Ethernet speeds, if both ends of the channel can handle this speed. If you buy a router or hub, make sure it supports Gigabit, or 1000base-T, speed. When you are buying Ethernet cables, choose "cat 5e", "cat 6", or "cat 6A" cables to make sure you get full speed.
Printers
Printers can be connected
- To your home network, by an ethernet cable, if your printer is "network enabled."
- To your home wireless network, by WiFi, if the printer is "WiFi enabled." Then you have the printer join the wireless network.
- To a single computer, by a USB cable. (Your computer could then use to let other network computers use it. I haven't tried this.)
- To your WiFi router, by a USB cable if it has a USB socket (I haven't tried this).
To use a printer on your home network and print to it from all your local computers (1 or 2 above), it needs a print server. My Brother printers have model numbers ending in "N", which means they have a built-in print server and can be connected to a network. (Some network printers have WiFi networking, others have Ethernet networking, some have both. Make sure you buy what you need: by mistake I once bought a printer without Ethernet for a family member.)
Wireless Networking
To connect your computer to the Internet using WiFi,
- Your computer needs WiFi hardware and software
- Your computer connects to a network name (SSID) from a router, or "access point." It may need a network password also.
Many people buy a WiFi router for their home, or rent a router from their cable company. They set up their own SSID and password, and connect their home computers wirelessly to their router. If you do this, configure your router to require a name and password, and use WPA2 or WPA3 encryption. Some routers let you set up a "guest network" with a different SSID: it lets visitors access the Internet but not your computers or printers.
Connecting a home printer to WiFi is similar: you may end up tedioiusly entering the SSID and password one letter at a time on the printer's control panel. Some WiFi routers have afeature called WPS that makes connecting to their network easier: you select "try to connect with WPS" on the printer, then press the WPS button on the router, then tell the printer the connection is OK.
WiFi When Traveling
When you check into a hotel, they give you the SSID of their router and instructions on logging in. Some cities provide "municipal wifi" to residents. Some phone and cable companies have routers in their area shared among their customers, e.g. "Xfinitywifi". Shared routers are convenient for occasional use, but can slow down if a lot of people try to use them.
WiFi Standards and Speed
Understand that WiFi speeds are routinely overstated. WiFi is also subject to congestion and interference from other radio devices. My Mac can see 24 SSIDs near our house. I remember when there were three. And each SSID has many more devices using its network. WiFi protocols have been improved and extended over the years to try to handle the additional demand.
WiFi uses little radios in the base station and the computer or phone. These radios automatically negotiate agreement on the best frequency and communications and security protocols. An older Mac might support "802.11 a/b/g/n" where 802.11 is the WiFi protocol and the letters identify different frequency and communications protocol suites. (If an older device talks to a newer one, they will use the fastest suite they have in common. Thus replacing an old router with a new one may not make communication with an older computer any faster.)
Here is my understanding of WiFi protocols and maximum speeds:
| Name | Protocol | MB/s | bands | notes |
|---|---|---|---|---|
| Wifi 4 | 802.11 a | 54 | 5 GHz | 1999 |
| Wifi 4 | 802.11 b | 11 | 2.4/5 GHz | 2000 |
| Wifi 4 | 802.11 g | 54 | 2.4/5 GHz | 2003 |
| Wifi 4 | 802.11 n | 300 | 2.4/5 GHz | 2007 AirPort Express |
| Wifi 5 | 802.11 ac | 1200 | 5 GHz | 2013+ Macs, iPhones |
| Wifi 6 | 802.11 ax | 9600 | 2.4/5 GHz | 2020+ Macs |
| Wifi 6E | 802.11 ax | 9600 | 2.4/5/6 GHz | 2023+ Macs; 1K QAM, 8 streams |
| Wifi 7 | 802.11 be | 46000 | 2.4/5/6 GHz | 2023+ Macs; MLO, 4K QAM, 16 streams |
WiFi 6E and WiFi 7 are supported by recent Macs.
Connecting Your Mac to a WiFi Network
These screen shots were made on Ventura 13.4.1.
Once your router is set up, you can connect multiple computers, phones, and tablets to the network. To connect a Mac, do this:
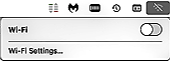
- If WiFi is off, click the WiFi icon in the menubar and click the slider to ON.
-
If a known network you have used before is available, the WiFi software will connect to it.
Otherwise, click on the name of the network you want to connect to.
- If you are reconnecting to a previous network, you won't have to give a password. Otherwise select the security method (should be WPA2 or WPA3 Personal), enter the password, and click "Join."
Configuring File Sharing on Your Mac
Other users on your network can use files on your Mac if you enable file sharing.
Select ![]() ► System Settings... ► General ► Sharing
to open the Sharing control panel.
You can enable several aspects of sharing:
allows users from other other computers to access files on your machine.
allows users from other computers to see your screen and move your mouse.
Click the ⓘ icon to get a control panel that says who can do what.
You only have to enable sharing once, and it will remain enabled till you turn it off, even if you restart the Mac.
Do not enable features unless you understand their security implications.
► System Settings... ► General ► Sharing
to open the Sharing control panel.
You can enable several aspects of sharing:
allows users from other other computers to access files on your machine.
allows users from other computers to see your screen and move your mouse.
Click the ⓘ icon to get a control panel that says who can do what.
You only have to enable sharing once, and it will remain enabled till you turn it off, even if you restart the Mac.
Do not enable features unless you understand their security implications.
The remote users have to be set up on your computer
in the ![]() ► System Settings... ► Users & Groups control panel.
Each Mac user in my family has their personal account defined on their machine,
and then I set up an administrator account for myself on each computer so I can install software and move files around when necessary.
► System Settings... ► Users & Groups control panel.
Each Mac user in my family has their personal account defined on their machine,
and then I set up an administrator account for myself on each computer so I can install software and move files around when necessary.
The network name for each computer is defined in
![]() ► System Settings... ► General ► About ► Name.
I prefer a computer name with no spaces or punctuation.
► System Settings... ► General ► About ► Name.
I prefer a computer name with no spaces or punctuation.
Different from Windows
It used to be that many Windows PCs shared their entire file system to any other machine on the local network -- read/write! This was certainly convenient, but it meant that if any local machine got a virus, the virus would install itself on all computers on the local network. This made it hard to completely eradicate a computer virus infection. I haven't used Windows in a long time, so I don't know if this is fixed.
File Sharing Between Macs On Your Network
In order to access files on another Mac, call it Al, on your network, enable sharing on Fred as described above.
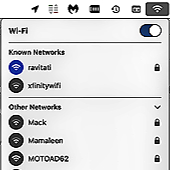
On Fred, open a Finder window. Navigate it to the folder containing your local files, or where you want to put files you copy.
Open a second Finder window with ⌘N: you will use it to view a folder on the remote computer.
In the left sidebar you will see a heading ,
and under that the name of the remote computer, e.g. Al.
Click on it.
On the first visit, the Finder will ask you for a password.
Give the name and password of an account on the remote computer and check .
If you don't see the remote computer you want to share files with, type ⌘K in the finder. You will see a window titled Network showing computers on your network that you can share with. Double click a target machine and you will see a new window titled with the computer name. It will say "Not Connected." Click "Connect As..." and you will see a login popup.
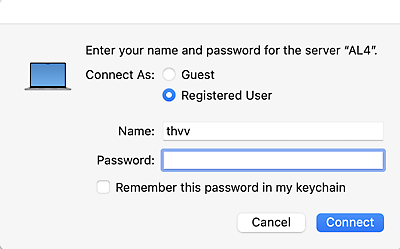
Select "Registered User" and enter the account name and password on the remote computer, and click "Connect". The Finder will show a new window that lets you access your account's home directory on the remote machine, and other locations.
Now you should have a list of folders you can open on
the remote computer.
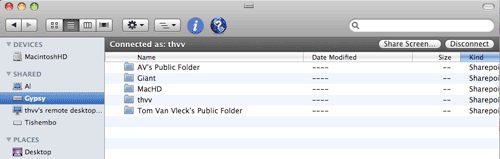
Double click on the folder you want and navigate around as usual.
When you drag file or folder icons between the two finder windows,
they will be copied from one computer to the other.
When you are done sharing files between computers you can click the little eject button (⏏) next to the remote computer's name in the Finder side bar, to disconnect. If you don't do this, you will get a warning dialogue when the remote computer reboots, and files could be damaged.
Guest Access
If you select "Guest" at the Finder sharing login window, then you can log in to a remote Mac as a "guest" -- it it permits this. You can read and copy files from the Public folder of any account on the remote machine, and you can copy files into the Dropbox folder of any account on the remote machine. Although this feature is very old, I have never needed to use it.
Screen Sharing Between Macs
If you click when you open up a remote Mac in the Finder,
and if you have allowed screen sharing in its ![]() ► System Settings... ► General ► Sharing,
then the Screen Sharing application will launch on your computer, showing the screen of the remote computer.
You can drive the cursor and send mouse clicks to the remote computer, and type into its applications.
This can be very valuable for configuring remote computers, recovering from bad video settings, and assisting other Mac users.
► System Settings... ► General ► Sharing,
then the Screen Sharing application will launch on your computer, showing the screen of the remote computer.
You can drive the cursor and send mouse clicks to the remote computer, and type into its applications.
This can be very valuable for configuring remote computers, recovering from bad video settings, and assisting other Mac users.
Screen sharing like this can be done across Messages to view and control a remote Mac anywhere, which can be very useful for remote support of friends and relatives.
I tried screen sharing with a Fedora Linux computer, and it popped up a dialog box asking permission, but then nothing happened.. need to debug this someday.
Networking with Windows Computers
You can do some file sharing from your Mac's finder to Windows computers on your home network. Haven't tried this in a long time. A simpler alternative is to install Dropbox on both Mac and Windows.
Accessing Linux and Unix with ssh, scp, and rsync
(For advanced users.)
I often use Terminal shell commands scp, rsync, and ssh to access files on Linux and Unix computers on my network (and elsewhere on the Internet). These are commands that come with every Mac (install the free Xcode developer tools). These commands will also work for Mac to Mac (since Mac OS X is based on FreeBSD Unix).
See Programming for a description of how I set up macOS as a developer's tool.
The version of rsync shipped with macOS is usually not the latest. If you do lots of work between your Mac and Unix/Linux machines, you should install tools from Homebrew.
Setting up SSH keys
These commands will keep asking for the password of an account on the remote system, which gets tedious. You can arrange things so that you only have to give a password once.
- Use Terminal command ssh-keygen -t rsa to generate a key pair. It will ask where to store the key pair and a new passphrase to secure it.
- Use scp to copy the public part of the key to the remote computer. On the remote computer, concatenate the public key onto .ssh/authorized_keys (access on authorized_keys must be 600 and on .ssh, 700).
- On the local computer, use ssh-add to load each private key into ssh-agent so that you are only asked for passwords once per login. (OS X starts ssh-agent when needed.) Set up your .bash_profile to load a standard set of keys whenever a Terminal shell is opened.
- You can use scp on the local computer to copy files to or from the remote computer, without giving a password each time.
- You can use rsync on the local computer to copy whole subtrees to the remote computer, syncing directories on the two computers one-way or two-way.
- You can also set up git on the remote computer so it can be accessed over ssh.
For example, I do this command to sync my home directory from my laptop to another computer (all on one line):
rsync -avzu --blocking-io -e "ssh" --exclude .Trash --exclude Cache/ /Users/thvv $user@$host:/Users
where $user and $host are shell variables set by the export command.